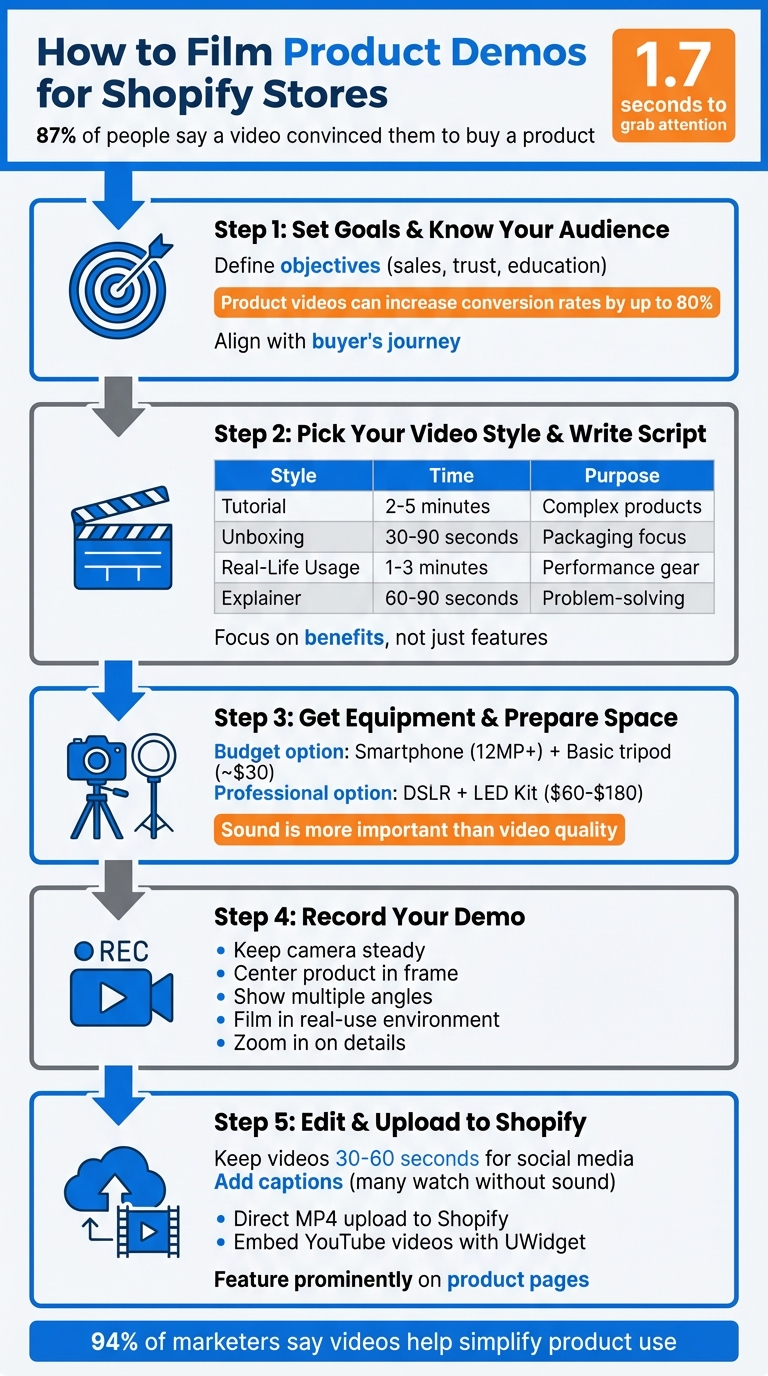
Want to boost sales on your Shopify store? Start using product demo videos. Here's why: 87% of people say a video convinced them to buy a product. Demo videos show your product’s features, answer questions, and build trust - all while keeping viewers engaged. But with just 1.7 seconds to grab attention, your videos need to be sharp, clear, and focused.
Key Steps to Create Effective Product Demos:
- Set Goals & Know Your Audience: Define what you want to achieve (sales, trust, or education) and tailor your content to your audience’s needs.
- Choose a Video Style: Tutorials, unboxing, or real-life usage videos work best depending on your product and audience.
- Use the Right Equipment: Start with a smartphone, basic tripod, and natural lighting. Upgrade as needed for sharper visuals and better sound.
- Film with Purpose: Highlight key features, use multiple angles, and keep your shots steady.
- Edit for Impact: Trim unnecessary parts, add captions, and keep videos short (30–60 seconds for social media).
Quick Tip:
Upload your demos directly to Shopify product pages or embed YouTube videos using apps like UWidget. Place them prominently to maximize their impact.
Start small, focus on showing how your product solves problems, and watch your conversions grow.
5 Steps to Create Effective Product Demo Videos for Shopify Stores
Step 1: Set Your Goals and Identify Your Audience
Define Your Video Objectives
Start by creating a project brief that clearly outlines the purpose of your demo video. Are you aiming to boost conversions, showcase your expertise, or reduce repetitive customer support queries? Each goal demands a unique approach. For instance, if you're looking to increase sales on a product page, your video should highlight benefits and include a strong call-to-action. On the other hand, if your goal is to establish authority, focus on delivering valuable insights or tutorials.
It’s also important to align your video’s objectives with your buyers' journey. New visitors need quick, compelling reasons to see your product’s value, while returning customers may appreciate more detailed tutorials or behind-the-scenes content. According to research, product videos can increase conversion rates by up to 80% - but only if they address the specific needs of your audience.
Your call-to-action should directly reflect your goals. For example, if driving sales is your priority, use a clear "Order Now" button. If building trust is the objective, highlight real customer testimonials to reinforce credibility. Once your goals are set, focus on who will benefit most from your video.
Know Your Target Viewers
With your objectives in place, dive into understanding your audience’s unique challenges, preferences, and goals. Even for the same product, the way you present it should adapt to your audience’s needs.
Start by researching your target demographic’s pain points. Frameworks like SPICED can help you identify the specific challenges your buyers face. Then, adjust your messaging to resonate with them. For example, Gen Z shoppers respond to casual, trend-driven language, while Gen Y buyers may appreciate a more practical tone. For B2B decision-makers, focus on highlighting ROI and measurable results rather than just product features.
The format and length of your video should also match the platform. For TikTok and Instagram Reels, stick to short, vertical clips under 90 seconds. For product pages on Shopify or similar platforms, longer, detailed walkthroughs - up to 10 minutes - work better. Social media audiences need quick, attention-grabbing content, while high-intent shoppers on your website are looking for in-depth information, like feature comparisons.
As business coach Maria Marquis wisely notes:
"The more you talk about yourself, the less you'll talk about the real problems your prospect is trying to solve."
Keep your focus on solving your audience’s challenges rather than self-promotion. Address their needs, and your video will resonate far more effectively.
Step 2: Pick Your Video Style and Write Your Script
Select a Video Format
Now that you’ve nailed down your goals and audience from Step 1, it’s time to pick a video style that highlights your product in the best way possible. For products that need a bit of guidance to understand, tutorial videos are a great choice. They break down complex setups into easy-to-follow steps and can even cut down on customer support requests by answering common questions upfront. In fact, 94% of marketers say videos are a great tool for simplifying product use.
If your product comes with eye-catching packaging or you’re teaming up with influencers, unboxing videos are the way to go. They capture the excitement of opening a new product and give viewers a clear look at what’s inside. On the other hand, real-life usage videos are perfect for showing how your product performs in action - think testing outdoor gear in the rain or using a kitchen gadget during meal prep. These videos help potential customers imagine how the product fits into their lives.
Here’s a quick comparison of video styles to help you decide:
| Video Style | Best For | Ideal Length |
|---|---|---|
| Tutorial | Complex products, setup instructions | 2–5 minutes |
| Unboxing | High-aesthetic packaging, first impressions | 30–90 seconds |
| Real-Life Usage | Performance gear, lifestyle products | 1–3 minutes |
| Explainer | Problem-solving, new product categories | 60–90 seconds |
Create Your Script
Once you’ve picked your format, the next step is writing a script that turns product features into real benefits for your audience. Think of your script as a mini-story. Start with a hook that grabs attention by addressing a specific problem, introduce your product as the solution, showcase its features as proof, and finish with a clear call-to-action. For instance, instead of a generic opening like, “Welcome to our product demo,” try something more engaging like, “Struggling to keep track of endless spreadsheets?” - this immediately connects with your audience’s pain points.
Keep the tone conversational and natural. Reading your script out loud is a great way to catch any awkward phrasing. Focus on showing the benefits behind the features. Instead of just saying, “It has scratch-resistant glass,” explain why that matters: “It lasts longer, saving you money on replacements”.
Tailor the length of your script to where it’ll be used. For social media, keep it short and sweet (30–60 seconds to highlight one key feature). For product pages, go a bit deeper (2–5 minutes to cover multiple features). Many viewers watch videos with the sound off, so plan on adding captions to highlight key points. Breaking your script into smaller segments can also make recording and editing much easier.
As Aliyah Marandiz, Founder of Sugardoh, wisely says:
"I think the best education is education that people don't know that they're actually learning from it."
The goal is to inform your audience without overwhelming them. Instead of rattling off every feature, focus on solving their challenges. This approach will set you up for success when you move on to editing and uploading in Step 5.
Step 3: Get Your Equipment and Prepare Your Filming Area
Required Filming Equipment
You don’t need to break the bank to create professional demos. The type of equipment you’ll need depends on where your videos will appear. For example, social media content often looks great when shot on a smartphone, while product pages might benefit from the sharper visuals of a DSLR or mirrorless camera. However, don’t underestimate the importance of audio. As Chris Lavigne from Wistia explains:
"Sound is arguably more important than video. If you're going to start upgrading your gear, start by purchasing a better microphone".
Even the most stunning visuals can be overshadowed by poor sound quality.
Start with what you already have and upgrade as needed. A smartphone with at least a 12MP camera is perfect for most social content. For more advanced features like precise depth of field and better color accuracy, cameras such as the Canon EOS Rebel SL3 or Nikon Z 5 provide professional results without being overly complicated. To avoid shaky footage, invest in a basic tripod (many cost less than $30). If you plan to move around while filming, a gimbal can ensure smooth, steady shots.
Lighting is another key factor in making your footage look polished. Natural light works wonders - set up near a large window with the light coming in from the side to create soft, flattering illumination. For consistent lighting regardless of the time of day, consider a three-point LED lighting kit or a ring light, which typically costs between $60 and $180. To fine-tune your lighting, use white foam boards to reflect light and black boards to add contrast, helping your product stand out without harsh shadows.
Here’s a quick guide to choosing equipment based on your budget and goals:
| Equipment Category | Budget Option | Professional Option |
|---|---|---|
| Camera | Smartphone (12MP+) | DSLR/Mirrorless (Canon EOS Rebel SL3, Nikon Z 5) |
| Audio | Smartphone Mic + Quiet Room | Lavalier Mic (Rode SmartLav+ ~US$62) or Shotgun Mic |
| Lighting | Natural Window Light + Foam Boards | Three-Point LED Kit or Ring Light (US$60–US$180) |
| Stability | Basic Tripod (~US$30) | Full-Size Tripod or 3-Axis Gimbal |
| Background | White Poster Board or Sheet | Professional Paper Sweep or Light Tent |
Once your gear is sorted, it’s time to set up your filming space for the best results.
Set Up Your Filming Space
With your equipment ready, focus on creating a filming area that works with your setup. Choose a quiet room with soft furnishings or carpet to reduce echo. Hard surfaces tend to reflect sound, which can lead to distracting background noise. Pay attention to lighting consistency - avoid mixing different light sources, as this can distort color accuracy.
For a professional look, use a clean, simple background. A "sweep", which is a continuous piece of white paper or fabric that curves seamlessly from the wall to the table, can create a polished, floating effect for your product. Secure the sweep with painter’s or gaffer’s tape to keep it steady during filming. If you’re showcasing a white product, add depth by placing black foam boards strategically to prevent the background from blending with the product.
Steer clear of direct sunlight, as it can create harsh shadows and overexposed areas. Instead, position your setup near a large window to take advantage of soft, indirect light. Adjust focus and exposure manually to avoid sudden shifts in brightness. Before you start filming, record a quick test clip to check for any audio issues, background noise, or echo. This simple step can save you from having to re-shoot later.
Step 4: Record Your Product Demo
Apply Proper Camera Techniques
Now that your filming space is ready, it's time to focus on the actual recording. The first rule? Keep your camera steady. Even minor shakes can make your video look unpolished. Use the tripod you set up earlier, or if you'll be moving around, opt for a gimbal to maintain stability.
Framing is just as critical as stability. Make sure your product is centered in the shot, especially since many viewers will be watching on their phones. Zoom in to showcase fine details - like textures, stitching, or finishes - that photos might not fully capture. Try out different angles to see what works best. Overhead shots are ideal for demonstrating assembly or usage, while close-ups are perfect for highlighting specific features. You can even use split-screen views to show multiple perspectives at once without interrupting the flow.
Before diving into the full shoot, record a short test clip. This quick step ensures your lighting, audio, and focus are on point, saving you from the frustration of redoing everything later. If the test looks good, you're ready to start showcasing your product’s features.
Show Your Product's Main Features
Your demo should go beyond just describing the product - it needs to prove its value. For instance, show off its durability with a drop test. If it's easy to assemble, film the entire setup process either in real-time or as a time-lapse. As Aliyah Marandiz, Founder of Sugardoh, explains:
"I think the best education is education that people don't know that they're actually learning from it. They're watching a video because they're sucked into the satisfying element... and then at the end of the video, they're like, 'Wait, what? I just learned how to sugar.'"
The setting matters, too. Filming in a real-use environment makes the product feel more relatable. Selling camping gear? Take it to the great outdoors. Promoting a kitchen gadget? Show it in action on a real countertop with actual ingredients. This helps viewers imagine the product in their own lives. Use close-ups to emphasize details like fabric texture, mechanism precision, or finish quality. Adding on-screen text or captions can also be helpful, especially for viewers watching without sound. Highlight key specifications as they’re demonstrated to reinforce your message.
sbb-itb-d9e5b3a
Step 5: Edit Your Video and Add It to Your Shopify Store
Edit Your Video
Once you've finished filming, it's time to refine your footage. Good editing not only enhances the quality of your product demo but also keeps your audience interested. Start by trimming out any unnecessary parts - like long pauses, throat-clearing, or filler words such as "um" or "like." This helps maintain a smooth and engaging pace. Remember, viewers decide within the first 1.7 seconds whether to keep watching, so make those opening moments count.
To make your video more effective, add on-screen text and captions to emphasize key features as they appear. This is especially important since many people watch videos without sound. Make sure your captions are easy to read on smaller screens like smartphones. You might also want to include light background music that aligns with your brand's vibe and subtle sound effects, like a "pop" when text or visuals appear, for a polished touch.
Aim to keep your video between 30 and 60 seconds long - this is the sweet spot for keeping viewers engaged. Export your finished video as an MP4 file, which works well for both social media platforms and Shopify. Don't forget to design an eye-catching thumbnail to grab attention before someone even presses play.
Once your video is polished and ready to go, it's time to add it to your Shopify store.
Upload Your Video to Shopify
There are two main ways to upload your video to your Shopify store.
The first option is to upload your MP4 file directly to your product pages using Shopify's media editor. To do this, go to the product page in your admin panel, click "Add media", and upload your video. Make sure to include descriptive alt text (125 characters or fewer) to improve SEO and make your content accessible. Shopify also offers tools for cropping, resizing, and even removing backgrounds, so you can fine-tune your video right within the platform.
The second option, ideal if you're hosting your video on YouTube, is to use UWidget. This app allows you to embed YouTube widgets directly into your store. With it, you can create features like video galleries, carousels, or sticky videos that stay visible as customers scroll. This approach works particularly well if you want to highlight multiple product demos.
Whichever method you choose, make sure your video is placed prominently on your product landing pages to maximize its impact.
How to Make a Product Demo (FREE Template)
Conclusion
Creating Shopify product demos doesn’t have to be complicated or expensive. By sticking to a straightforward plan - defining your goals, understanding your audience, picking the right video style, gathering essential equipment, and filming with care - you can craft demos that turn curious browsers into paying customers. With 87% of people saying they’ve been convinced to buy a product or service after watching a video, it’s clear that investing time into this process can pay off.
The magic really happens during the editing phase, where your raw footage becomes a polished, attention-grabbing demo. Don’t forget to include captions to make your video accessible to everyone. Once your video is ready, showcase it prominently on your store to maximize its impact.
If you’re using YouTube to host your videos, tools like UWidget can help integrate them seamlessly into your Shopify store. Features such as shoppable tags, video galleries, and carousel sliders allow customers to watch and shop in one place, without ever leaving your site.
Start small and refine your process over time. Focus on highlighting the value of your products, and you’ll see the conversions follow.
FAQs
What type of video works best for explaining complex products?
When it comes to complex products, a demonstration video featuring a real person can work wonders. These videos showcase the product in action, giving viewers a clear idea of how it functions in everyday situations.
By emphasizing practical applications, you can illustrate how the product addresses specific challenges or integrates effortlessly into daily routines. This approach not only clarifies the product's value but also helps build trust with potential customers.
How can I make sure my product demo videos are accessible to everyone?
To make your product demo videos more inclusive, start by adding captions or transcripts for all spoken content. This ensures that viewers who are deaf or hard of hearing can follow along. Next, include descriptive alt text for visuals, so those using screen readers can grasp the context. Lastly, choose a video player that supports screen readers and keyboard navigation to enhance usability. These steps not only support accessibility for individuals with disabilities but also create a better viewing experience for everyone, boosting engagement across the board.
What affordable equipment do I need to film product demos for my Shopify store?
You don’t need to break the bank to create professional-looking product demos for your Shopify store. With a few affordable tools, you can produce high-quality videos that effectively highlight your products.
Start with a camera - a smartphone with manual controls or an entry-level DSLR or mirrorless camera (like the Canon EOS M50) works perfectly. Pair it with a tripod to keep your shots steady and professional. For audio, consider an external microphone - a budget-friendly shotgun mic or lavalier mic will significantly improve sound quality. Lighting is crucial, so invest in affordable options like softbox lights or a ring light (priced between $30 and $60) to ensure your products are well-lit. A simple backdrop, such as white or neutral-colored fabric, provides a clean and distraction-free background. Lastly, use free editing software like iMovie or DaVinci Resolve to refine your videos and give them a polished finish.
With these essentials, you can create engaging product demos that captivate your audience and drive sales - all without overspending.